mirror of
https://github.com/jackyzha0/quartz.git
synced 2025-12-27 14:54:05 -06:00
251 lines
8.2 KiB
Markdown
251 lines
8.2 KiB
Markdown
---
|
||
date created: 2025-03-19 15:42
|
||
date updated: 2025-04-02 11:45
|
||
tags:
|
||
- docker
|
||
- Everest
|
||
link: "false"
|
||
share: "true"
|
||
---
|
||
|
||
devcontainer 设置是开发 EVerest 项目的一种便捷方式。它使用 Docker 创建跨不同机器一致的开发环境。
|
||
|
||
cd /workspace/.devcontainer && docker compose up -d# 创建基于 devcontainer 的 EVerest 工作区
|
||
|
||
## 创建并进入工作区
|
||
|
||
```shell
|
||
mkdir everest_workspace
|
||
cd everest_workspace
|
||
```
|
||
|
||
## 运行安装脚本
|
||
|
||
```shell
|
||
export BRANCH="main" && bash -c "$(curl -s --variable %BRANCH=main --expand-url https://raw.githubusercontent.com/EVerest/everest-dev-environment/{{BRANCH}}/devcontainer/setup-devcontainer.sh)"
|
||
```
|
||
|
||
该脚本将要求您提供以下信息:
|
||
|
||
1. Workspace directory: 默认为当前目录,按回车键即可保持默认。
|
||
2. everest-dev-environment version: 默认为“main”。按 Enter 键保留默认设置。
|
||
|
||
mac下会出现 **realpath** 命令不支持 **-m** 选项的问题。执行`brew install coreutils`,然后将下面的行添加到你的 shell 配置文件,配置环境变量。
|
||
|
||
```shell
|
||
export PATH="/usr/local/opt/coreutils/libexec/gnubin:$PATH"
|
||
```
|
||
|
||
## 在 Visual Studio Code 中打开工作区
|
||
|
||
在 vscode 中打开这个文件夹,VS Code 将要求在容器中重新打开工作区。单击按钮“在容器中重新打开”。
|
||
|
||
等待安装各种依赖。
|
||
|
||
# everest-core
|
||
|
||
## 下载核心库everest-core
|
||
|
||
```shell
|
||
everest clone everest-core
|
||
```
|
||
|
||
或者
|
||
|
||
```shell
|
||
everest clone everest-core --https
|
||
```
|
||
|
||
## 编译并安装
|
||
|
||
```shell
|
||
mkdir -p everest-core/build
|
||
cd everest-core/build
|
||
cmake ..
|
||
make -j$(nproc) install
|
||
```
|
||
|
||
这里对比[[/content/Notes/OCPP/Everest/搭建环境/构建EVerest|构建EVerest]]的内容,不需要先构建 edm 的内容。在devcontainer环境中,很多初始步骤已经完成了,这与标准安装步骤不同。
|
||
在devcontainer中:
|
||
|
||
- EDM==已预安装== - edm命令已在/usr/local/bin/edm可用
|
||
- Everest工具已预安装 - everest命令也已在~/.local/bin/everest可用
|
||
- 环境已预配置 - devcontainer已经设置好了所需的环境变量和依赖项
|
||
|
||
```mermaid
|
||
graph LR
|
||
BaseImage["基础Docker镜像<br>ghcr.io/everest/everest-ci/dev-env-base"]
|
||
DevTools["预安装开发工具<br>(edm, everest等)"]
|
||
DevContainer["完整开发容器"]
|
||
Workspace["工作区目录<br>(/workspace)"]
|
||
|
||
BaseImage --> |构建时安装| DevTools
|
||
DevTools --> DevContainer
|
||
Workspace --> |挂载| DevContainer
|
||
|
||
style DevContainer fill:#e0f7fa,stroke:#0277bd,stroke-width:2px
|
||
```
|
||
|
||
# docker 的隔离性
|
||
|
||
DevContainer的隔离性及其与直接在环境中开发的区别,可以通过下图清晰地理解:
|
||
|
||
```mermaid
|
||
graph TB
|
||
subgraph "主机系统"
|
||
Host["主机OS (宿主机)"]
|
||
IDE["VSCode (IDE)"]
|
||
|
||
subgraph "Docker Engine"
|
||
subgraph "DevContainer"
|
||
Container["容器OS (Ubuntu/Linux)"]
|
||
EVLibs["EVerest库和依赖"]
|
||
BuildTools["构建工具 (cmake, make等)"]
|
||
EVCore["everest-core项目文件"]
|
||
DevEnv["开发工具 (edm, everest等)"]
|
||
end
|
||
end
|
||
|
||
Mount["共享卷 (Volume)"]
|
||
|
||
Host --- IDE
|
||
IDE --- Docker
|
||
Docker --- Container
|
||
Host --- Mount
|
||
Mount --- Container
|
||
end
|
||
|
||
style DevContainer fill:#e0f7fa,stroke:#0277bd,stroke-width:2px
|
||
style Docker fill:#f5f5f5,stroke:#616161,stroke-width:1px
|
||
```
|
||
|
||
## DevContainer的隔离性机制
|
||
|
||
### Docker容器隔离
|
||
|
||
DevContainer利用Docker容器技术实现以下隔离:
|
||
|
||
- **进程隔离**: 容器内的进程与主机系统隔离运行
|
||
- **文件系统隔离**: 容器有自己独立的文件系统
|
||
- **网络隔离**: 容器有独立的网络命名空间
|
||
- **资源隔离**: 可限制CPU、内存等资源使用
|
||
|
||
### 共享卷机制
|
||
|
||
```mermaid
|
||
graph LR
|
||
subgraph "主机文件系统"
|
||
HostDir["工作目录<br>/Users/wyq/Code/github/everest_workspace"]
|
||
end
|
||
|
||
subgraph "容器文件系统"
|
||
ContainerDir["/workspace"]
|
||
end
|
||
|
||
HostDir <--> ContainerDir
|
||
|
||
style HostDir fill:#e3f2fd,stroke:#1565c0
|
||
style ContainerDir fill:#e8f5e9,stroke:#2e7d32
|
||
```
|
||
|
||
- 主机工作目录被"挂载"到容器的`/workspace`目录
|
||
- **对容器中文件的修改立即反映到主机文件系统**
|
||
- 这使您可以使用主机上的工具(如Git)来管理文件,同时在容器内构建/运行
|
||
|
||
### VSCode一体化
|
||
|
||
```mermaid
|
||
graph LR
|
||
VSCode["VSCode (主机)"] --> Extension["Remote-Containers<br>扩展"]
|
||
Extension --> API["Docker API"]
|
||
API --> Container["开发容器"]
|
||
Container --> Shell["容器Shell"]
|
||
Container --> Extensions["VSCode扩展<br>(在容器内运行)"]
|
||
Container --> Debug["调试器"]
|
||
|
||
style VSCode fill:#bbdefb,stroke:#1976d2
|
||
style Container fill:#c8e6c9,stroke:#388e3c
|
||
```
|
||
|
||
- VSCode的Remote-Containers扩展充当桥梁
|
||
- 编辑器UI在主机上运行,但所有命令在容器内执行
|
||
- 调试、终端、代码补全都在容器环境中运行
|
||
|
||
## 与直接在主机环境开发的区别
|
||
|
||
| 特性 | DevContainer | 直接在主机环境 |
|
||
| ---------- | ---------------- | --------------- |
|
||
| **依赖管理** | 所有依赖预安装在容器中,相互隔离 | 全局安装依赖,可能产生版本冲突 |
|
||
| **环境一致性** | 所有开发者使用完全相同的环境 | 环境因开发者配置不同而异 |
|
||
| **环境污染** | 容器删除后不留痕迹 | 安装的工具和库留在系统中 |
|
||
| **多项目兼容性** | 不同项目可使用不同版本的同一依赖 | 依赖版本冲突需要虚拟环境等解决 |
|
||
| **资源使用** | 更高的存储和内存开销 | 较低的系统资源占用 |
|
||
| **安全隔离** | 提高安全性,容器权限有限 | 工具运行在本地系统,权限较高 |
|
||
|
||
## EVerest特有的优势
|
||
|
||
对于EVerest项目,DevContainer提供了:
|
||
|
||
1. **预配置工具链**: 所有EVerest特有工具(如edm、everest)已预装
|
||
2. **编译环境优化**: 已配置好所有编译依赖和标准
|
||
3. **一致性测试**: 确保所有开发者的代码在相同环境中测试
|
||
4. **简化协作**: 新开发者可快速上手,无需复杂的环境设置
|
||
|
||
这种隔离方式使得EVerest项目开发既能保持环境一致性,又不会污染您的主机系统,同时还能享受VSCode提供的现代开发体验。
|
||
|
||
# 连接平台
|
||
|
||
## 修改平台 URL
|
||
|
||
例如,如果想连接到地址为ws://example.com:8080的OCPP平台,可以使用以下命令:
|
||
|
||
```shell
|
||
cd /workspace/everest-core/build/dist/share/everest/modules/OCPP201/component_config/standardized
|
||
cp InternalCtrlr.json InternalCtrlr.json.bak # 备份原文件
|
||
sed -i 's|"ocppCsmsUrl": "ws://localhost:9000"|"ocppCsmsUrl": "ws://example.com:8080"|g' InternalCtrlr.json
|
||
```
|
||
|
||
## 启动 Everest
|
||
|
||
```shell
|
||
./everest-core/build/run-scripts/run-sil-ocpp201.sh
|
||
```
|
||
|
||
### 解决 mqtt连接问题
|
||
|
||
```shell
|
||
cd /workspace/.devcontainer && docker compose up -d
|
||
```
|
||
|
||
### 修复连接问题
|
||
|
||
|
||
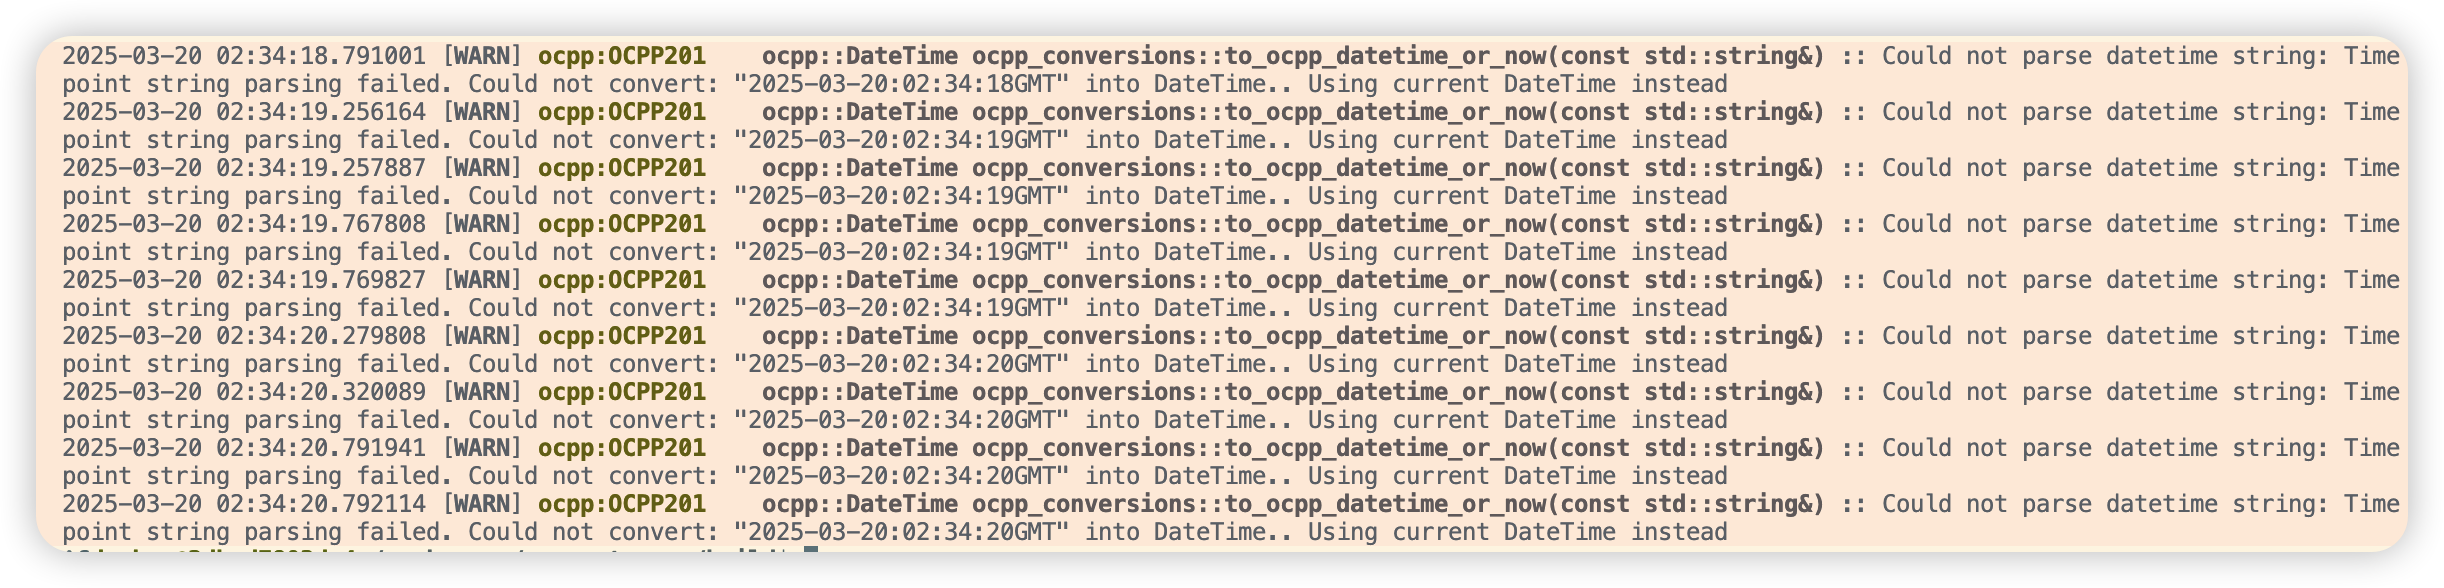
不知道哪来的野生时间格式,一直打印。
|
||
|
||
```c
|
||
ocpp::DateTime to_ocpp_datetime_or_now(const std::string& datetime_string) {
|
||
std::optional<ocpp::DateTime> timestamp;
|
||
try {
|
||
#ifndef UL_FIX_PATCH
|
||
// Fix malformed datetime string format if needed
|
||
std::string fixed_datetime = datetime_string;
|
||
|
||
// Check for format like "2025-03-20:02:26:05GMT" and fix it
|
||
std::regex malformed_pattern("(\\d{4}-\\d{2}-\\d{2}):(\\d{2}:\\d{2}:\\d{2})(GMT|UTC)?");
|
||
if (std::regex_match(datetime_string, malformed_pattern)) {
|
||
// Replace ":" between date and time with "T" and ensure proper timezone format
|
||
fixed_datetime = std::regex_replace(datetime_string, malformed_pattern, "$1T$2Z");
|
||
EVLOG_info << "Fixed malformed datetime format from: " << datetime_string << " to: " << fixed_datetime;
|
||
}
|
||
|
||
return ocpp::DateTime(fixed_datetime);
|
||
#else
|
||
return ocpp::DateTime(datetime_string);
|
||
#endif
|
||
} catch (const ocpp::TimePointParseException& e) {
|
||
EVLOG_warning << "Could not parse datetime string: " << e.what() << ". Using current DateTime instead";
|
||
}
|
||
return ocpp::DateTime();
|
||
}
|
||
```
|